深度学习2D图像物体对象检测
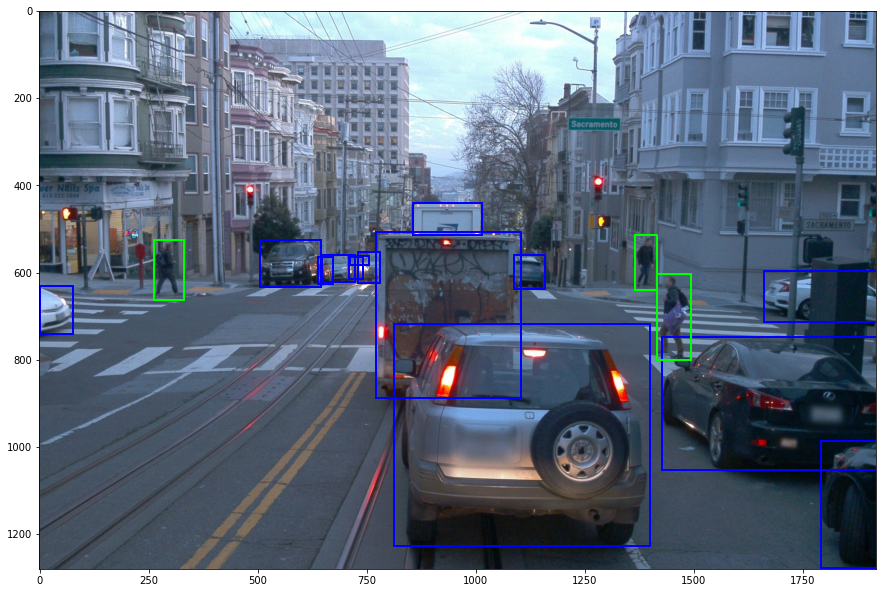
对于自动驾驶系统需要完全理解环境而不只是进行图像分类,需要一个物体检测算法来对图像中的每个物体进行定位和分类。
1. 两类物体对象检测算法
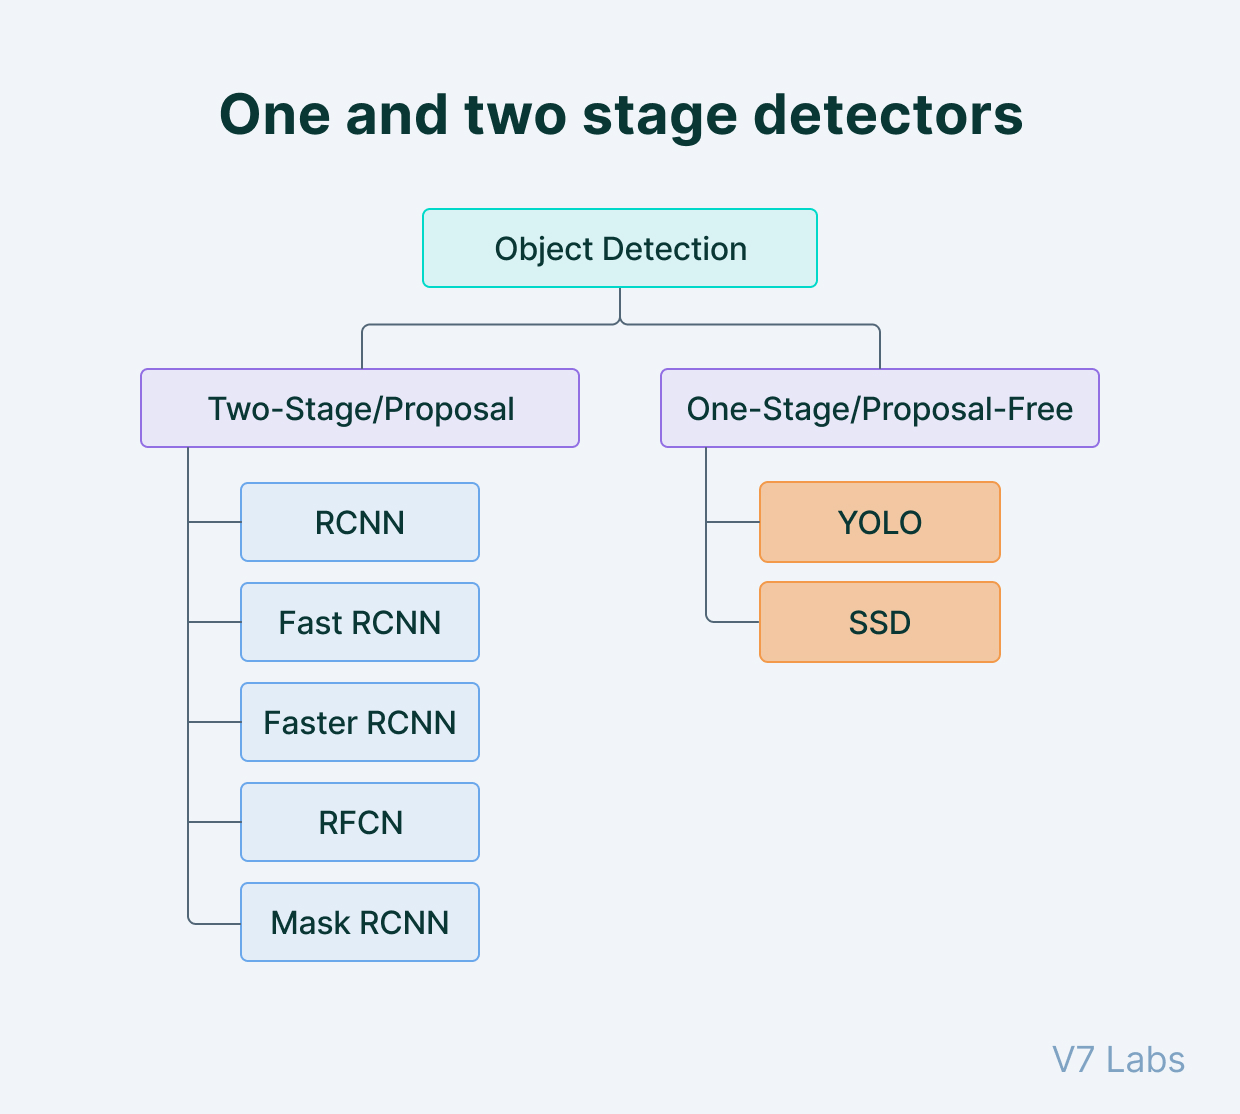
1.1 基于区域的卷积神经网络(RCNNs)(两步对象检测)
第一类对象检测算法基于一种对图像中的区域进行分割的迭代算法—选择性搜索。
RCNN
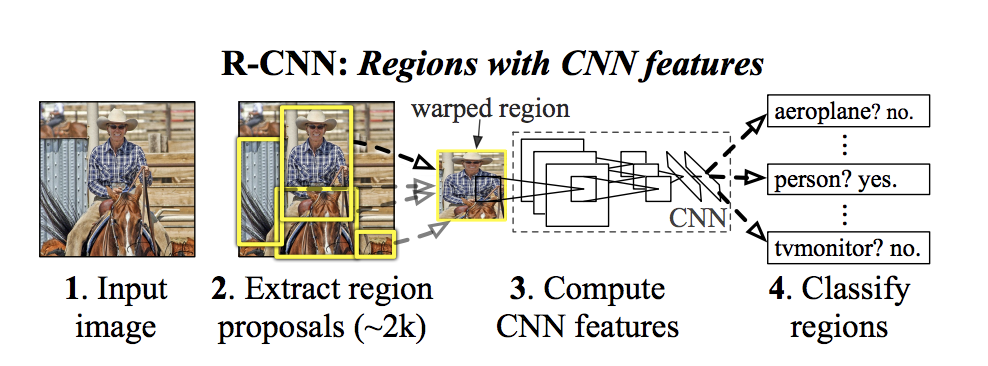
基于区域的 CNN (RCNN) 系列的第一篇论文使用通过选择性搜索创建的区域作为卷积神经网络的输入。这篇 2014 年的论文采用了选择性搜索创建的区域,并将其调整为固定大小的分辨率,然后再将其输入 CNN。
尽管在性能方面取得了突破,但这种架构仍然存在一些缺点:
-
需要将每个区域调整为固定大小的输入
-
需要为每个区域重新计算 CNN 特征
-
它很慢,因为它依赖于选择性搜索
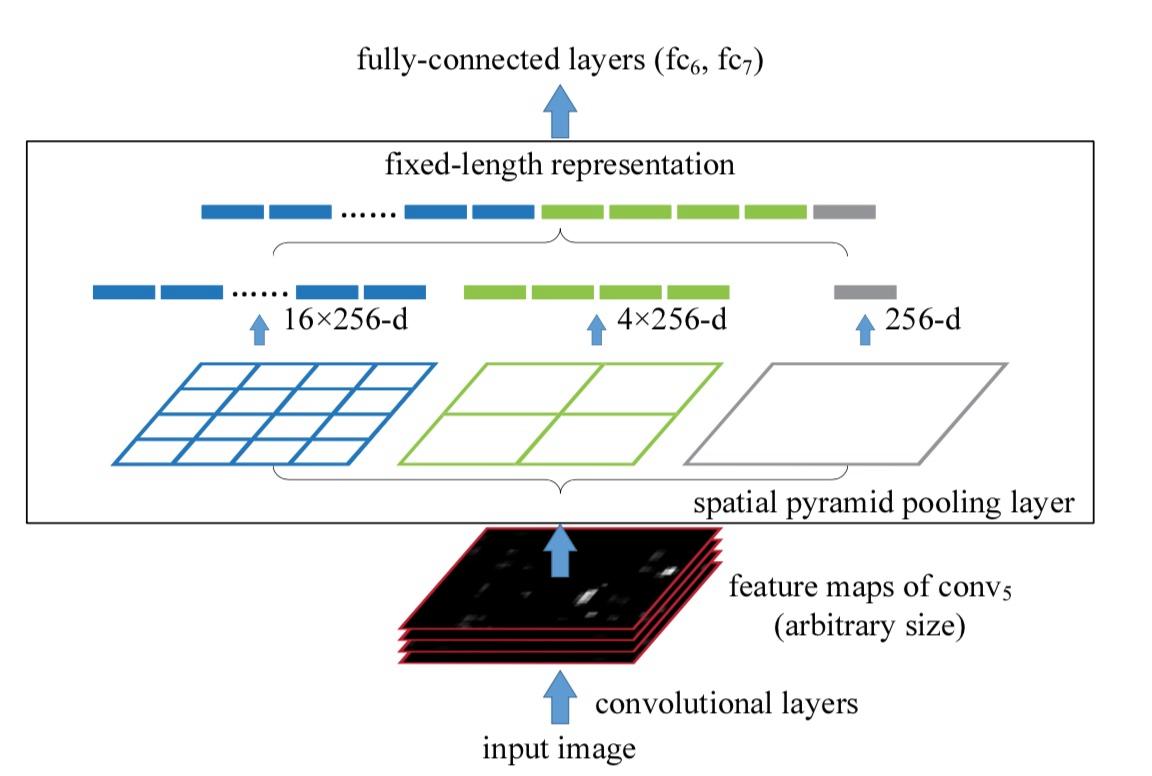
SPPNet

SPPNet 引入了一种新型层来修复 RCNN 架构的一些问题:空间金字塔池化 (SPP) 层。 该层采用可变大小的输入并创建固定大小的输出。
让我们考虑一个具有 1x1、2x2、2x3 和 4x4 分割的 4 级 SPP 层的示例。 我们向该层提供一个 2D 数组。该数组将使用这些拆分中的每一个进行池化,创建一个维度为 1x1 + 2x2 + 2x3 + 4x4 = 27 的向量。无论输入图像的分辨率如何,输出向量将始终是 27x1 的向量。
SPPNet 还通过重用 CNN 功能采用了与 RCNN 不同的方法。 实际上,不是将裁剪后的输入图像馈送,而是将整个图像馈送到 CNN,并使用选择性搜索区域来裁剪最终的特征图。然后将这些区域馈送到 SPP 层。通过这样做,SPPNet 获得了与 RCNN 相似的性能,同时将推理时间提高了近 100 倍。
Fast-RCNN
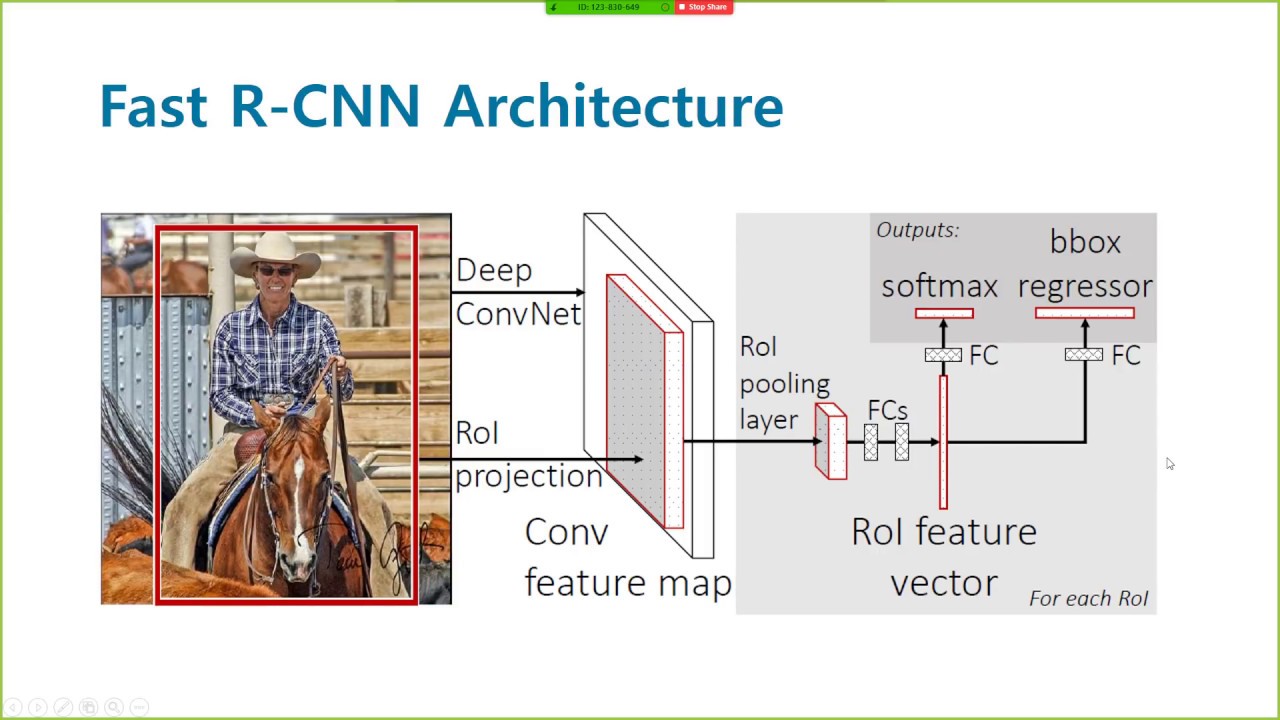
Fast-RCNN 通过使用多任务损失和端到端训练方法改进了 RCNN 和 SPPNet,这意味着单个损失函数用于对象的分类和边界框的回归。因此,模型可以作为单个实体进行训练,而不必分别训练不同的模块。该模型还使用感兴趣区域 (ROI) 池化,即 1 级 SPP 层。
Faster-RCNN
Faster RCNN 架构是 RCNN 系列的最新版本。
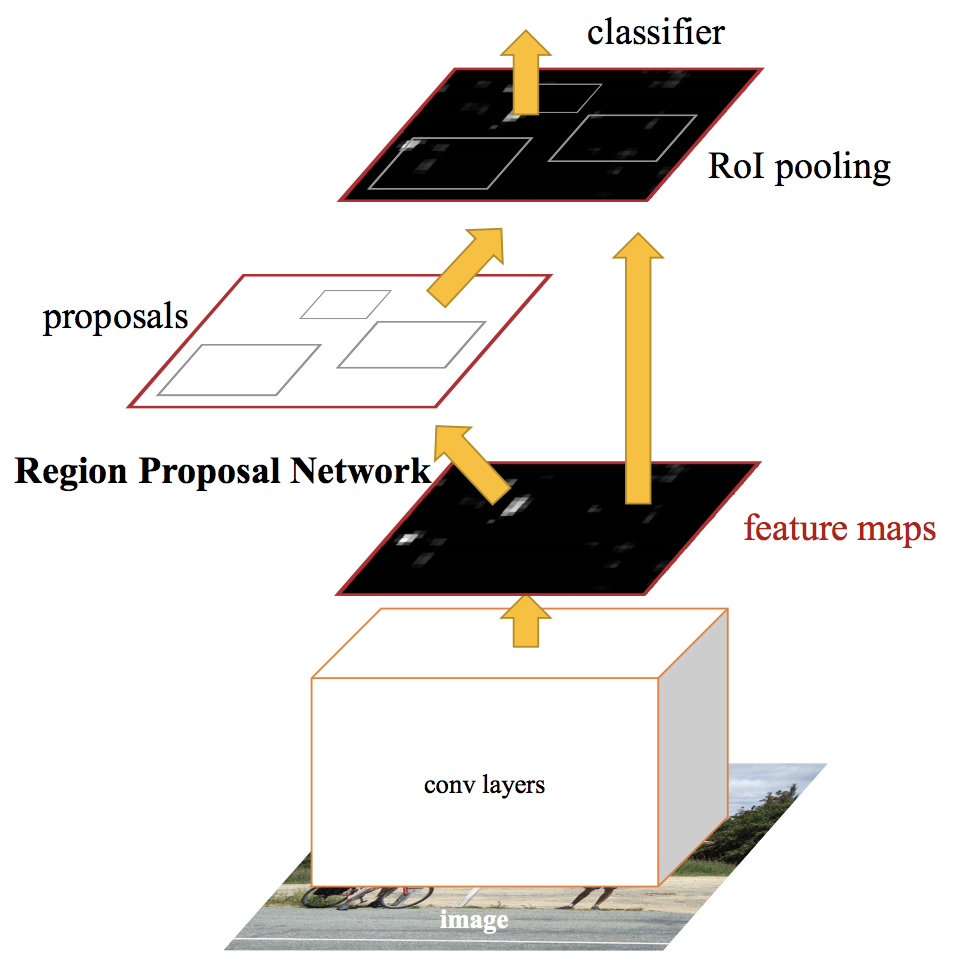
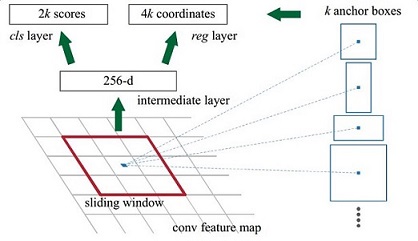
它通过不依赖选择性搜索来改进 RCNN 和 FastRCNN。相反,它使用区域提议网络 (RPN) 来生成 ROI。RPN 使用最后一个卷积层的特征图来生成 ROI。RPN 在特征图上使用一个滑动窗口,对于这个窗口的每个位置,它生成 k 个锚框。这些锚框用于确定该区域是否包含对象。
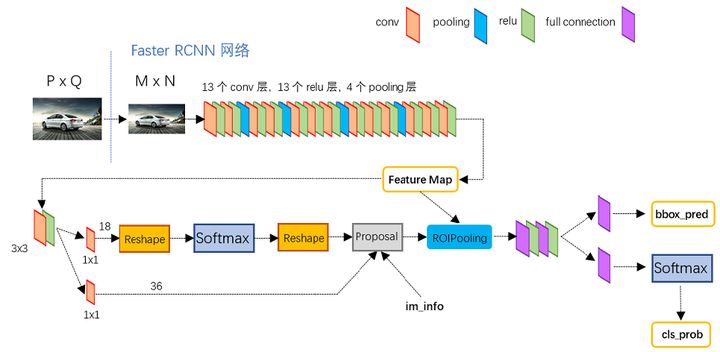
由于多任务损失函数,FasterRCNN 的所有组件都被同时训练。
1.2 YOLO(一步对象检测)

You Only Look Once (YOLO) 采用与 FasterRCNN 截然不同的方法。这篇 2016 年论文的作者没有依赖区域提议步骤,而是直接将输入图像拆分为网格。对于网格的每个元素,网络预测 B 个边界框和对象性分数。
通过去掉区域提议步骤,YOLO 提供了比 FasterRCNN 更快的推理时间。
目前已经发展到第五个版本。 YOLO仍然是最流行的对象检测架构之一。
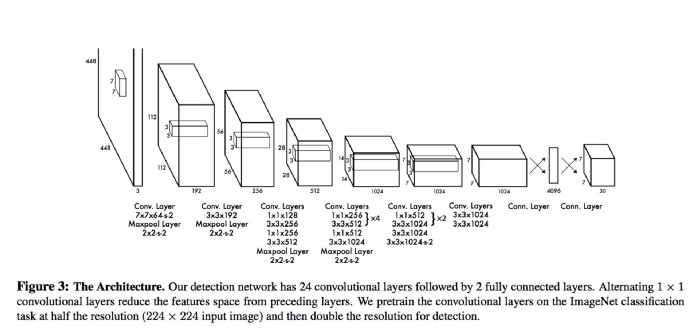
yolo网络的创新设计:
(1)yolo的基础网络灵感来源于GoogLeNet,但是并没有采取其inception的结构,而是简单的使用了1×1的卷积核。基础模型中共有24个卷积层,后面接2个全连接层;
(2)yolo并没有使用Relu激活函数,而是使用了leaky rectified linear激活函数;
1.3 算法对比
两步对象检测模型,例如 FasterRCNN,需要一个区域提议步骤来提议 ROI,再对这些感兴趣的区域进行分类。
一步对象检测算法不需要区域提议步骤,直接从输入图像开始工作。虽然这最初意味着一步对象检测器速度更快但准确度较低,但 YOLO 的最新迭代显示出比 FasterRCNN 更好的性能。
然而,FasterRCNN 仍然是最流行的对象检测算法之一,这可能是因为它在各种库中的广泛可用性以及行业采用更新架构的惯性。
1.4其他对象检测算法
- SSD: Single Shot MultiBox 探测器
- CenterNet:用于目标检测的关键点三元组
- 聚焦稠密物体检测损失
2. 检测后边界框处理
NMS(非最大抑制)
非最大抑制(NMS)是一种去除冗余检测的后处理方法。对象检测算法往往会输出大量的边界框。通过使用每个预测的置信度分数,我们可以通过去除高重叠/低置信度预测来清理这些预测边界框。
Soft-NMS
在 2017 年的一篇论文中,作者认为 NMS 实际上可能会通过删除高度遮挡对象的预测来损害对象检测算法的性能。他们提出了 Soft-NMS 算法。soft-NMS不会删除与较高置信度预测高度重叠的预测,而是降低它们的置信度分数。通过这样做,Soft-NMS提高了密集环境中对象检测算法的性能。
Python实现NMS算法函数
import json

from utils import calculate_iou, check_results


def nms(predictions):
    """
    non max suppression
    args:
    - predictions [dict]: predictions dict
    returns:
    - filtered [list]: filtered bboxes and scores
    """

    data = []
    for bb, sc in zip(predictions['boxes'], predictions['scores']):
        data.append([bb, sc])

    data_sorted = sorted(data, key = lambda k: k[1])[::-1]
    filtered = []
    for i, bi in enumerate(data_sorted):
        discard = False
        for j, bj in enumerate(data_sorted):
            if i == j:
                continue
            iou = calculate_iou(bi[0], bj[0])
            if iou > 0.5:
                if bj[1] > bi[1]:
                    discard = True
        if not discard:
            filtered.append(bi)
    return filtered


if __name__ == '__main__':
    with open('../data/predictions_nms.json', 'r') as f:
        predictions = json.load(f)

    filtered = nms(predictions)
    check_results(filtered)
检测算法评价
对象检测任务通常用Mean Average Precision (mAP) 作为检测算法评价表的指标。 mAP指标有多种变体。Python库pycocotools提供了一种评估对象检测结果的简单方法。
mAP代码实现
import copy
import json
from collections import Counter

import matplotlib.pyplot as plt
import numpy as np

from utils import calculate_iou, check_results


if __name__ == '__main__':
    # load data
    with open('../data/predictions.json', 'r') as f:
        preds = json.load(f)

    with open('../data/ground_truths.json', 'r') as f:
        gts = json.load(f)

    # sort predictions by scores
    boxes = preds[0]['boxes']
    classes = preds[0]['classes']
    scores = preds[0]['scores']

    predictions = [(bb, cl, sc) for bb, cl,sc in zip(boxes, classes, scores)]
    predictions = sorted(predictions, key=lambda k:k[-1])[::-1]

    # create precision - recall plot
    total = len(gts[0]['boxes'])
    tp = 0
    curve = []
    for idx, pred in enumerate(predictions):
        for bb in gts[0]['boxes']:
            iou = calculate_iou(bb, pred[0])
            # print(iou)
            if iou > 0.5:
                if pred[1] == 1:
                    tp += 1
        prec = tp / (idx+1)
        rec = tp / total
        curve.append([prec, rec])

    # smooth PR curve
    curve = np.array(curve)
    ct = Counter(curve[:, 1])
    boundaries = sorted([k for k,v in ct.items() if v > 1])
    # get max precision values
    maxes = []
    for i in range(len(boundaries)):
        if i != len(boundaries) - 1:
            loc = [p[0] for p in curve if boundaries[i+1] >= p[1] > boundaries[i]]
            maxes.append(np.max(loc))
        else:
            loc = [p[0] for p in curve if p[1] > boundaries[i]]
            maxes.append(np.max(loc))
    smoothed = copy.copy(curve)
    replace = -1
    for i in range(smoothed.shape[0]-1):
        if replace != -1:
            smoothed[i, 0] = maxes[replace]
        if smoothed[i, 1] == smoothed[i+1, 1]:
            replace += 1

    plt.plot(curve[:, 1], curve[:, 0], linewidth=4)
    plt.plot(smoothed[:, 1], smoothed[:, 0], linewidth=4)
    plt.xlabel('recall', fontsize=18)
    plt.ylabel('precision', fontsize=18)
    plt.show()

    # calculate mAP
    cmin = 0
    mAP = 0
    for i in range(smoothed.shape[0] - 1):
        if smoothed[i, 1] == smoothed[i+1, 1]:
            mAP += (smoothed[i, 1] - cmin) * smoothed[i, 0]
            cmin = smoothed[i, 1]
    mAP += (smoothed[-1, 1] - cmin) * smoothed[-1, 0]
    check_results(mAP)
3. TensorFlow 对象检测API应用
Tensorflow 对象检测 API 提供了一个简单的接口可以方便地在 TensorFlow 中开发和训练对象检测模型。它使用单个配置文件来描述整个训练管道,包括模型架构、不同的数据集和超参数。
配置文件(config file)结构包括以下几部分
-
model:包含模型架构的描述(例如:模型名称、主干)
-
train_config:包含训练参数(例如:batch size)
-
train_input_reader:包含训练文件位置
-
eval_config:包含 eval 参数(例如:metrics)
-
eval_input_reader:包含 eval 文件位置
Tensorboard是TensorFlow的定制仪表板,用于监控模型的训练。只需运行 Tensorboard–logdir < logdir >启动Tensorboard服务器,其中logdir是日志文件的位置。
模型训练
训练深度学习模型需要将数据从CPU传输到GPU。此类数据传输可能会造成瓶颈,减慢训练速度并花费大量资金。由于 CPU 和 GPU 具有不同的限制,因此了解数据从一台设备移动到另一台设备的位置以及如何识别训练管道中的任何潜在问题至关重要。
nvtop 是一个很棒的开源工具,用于跟踪 GPU 的性能。它是 htop 的 GPU 版本,对于识别训练管道的任何潜在问题非常有用。
训练深度神经网络时一个非常常见的问题是 GPU 空闲,因为它接收数据的速度不够快。换句话说,GPU 处理数据的速度比 CPU 加载数据的速度要快。
在针对新问题训练神经网络模型时,遵循以下步骤是一个较好的起始动作:
-
1.与数据合二为一,尽可能深入地研究和分析您的数据集
-
2.建立算法评价基线
-
3.仔细检查训练管道
-
4.从一个简单的模型开始,先不要使用任何训练技巧(如学习率退火)
-
5.根据训练结果进行迭代
TensorFlow实现神经网络训练学习率退火函数
import argparse
import logging

import tensorflow as tf
from tensorflow.keras.optimizers import schedules
from utils import get_datasets, get_module_logger, display_metrics, \
    create_network, LrLogger


def exponential_decay(model, callbacks, lr=0.001):
    """ use exponential decay """
    # add decay
    scheduler = schedules.ExponentialDecay(lr, decay_steps=100, decay_rate=0.95)
    optimizer = tf.keras.optimizers.Adam(learning_rate=scheduler)

    # compile model
    model.compile(optimizer=optimizer,
                loss=tf.keras.losses.SparseCategoricalCrossentropy(from_logits=True),
                metrics=['accuracy'])

    return model, callbacks


def step_decay(model, callbacks, lr=0.001):
    """ create custom decay using learning rate scheduler """
    def scheduler(epoch, lr):
        if epoch % 10 == 0 and epoch > 0:
            lr /= 2
        return lr
    callbacks.append(tf.keras.callbacks.LearningRateScheduler(scheduler))

    # create optimizer
    optimizer = tf.keras.optimizers.Adam(learning_rate=lr)

    # compile model
    model.compile(optimizer=optimizer,
                loss=tf.keras.losses.SparseCategoricalCrossentropy(from_logits=True),
                metrics=['accuracy'])

    return model, callbacks


if __name__  == '__main__':
    logger = get_module_logger(__name__)
    parser = argparse.ArgumentParser(description='Download and process tf files')
    parser.add_argument('-d', '--imdir', required=True, type=str,
                        help='data directory')
    parser.add_argument('-e', '--epochs', default=10, type=int,
                        help='Number of epochs')
    args = parser.parse_args()

    logger.info(f'Training for {args.epochs} epochs using {args.imdir} data')
    # get the datasets
    train_dataset, val_dataset = get_datasets(args.imdir)
    logger = LrLogger()
    callbacks = [logger]

    model = create_network()

    # model, callbacks = exponential_decay(model, callbacks)
    model, callbacks = step_decay(model, callbacks)

    history = model.fit(x=train_dataset,
                        epochs=args.epochs,
                        validation_data=val_dataset,
                        callbacks=callbacks)
    display_metrics(history)